This lesson asks students to consider two very different depictions of the Battle of Bunker Hill created by contemporaries. The artist, in each case, was present at the Siege of Boston and familiar with the setting of the battle. Neither artist participated in the battle, but both men witnessed it from afar and had the opportunity to speak to participants.
The goal of the lesson is to encourage students to consider why these artists, and artists in general, depict events in different ways. A premise of the lesson is that artists depict events in order to convey ideas about those events that were understood by contemporary viewers but which may not be clear to us, more than two hundred years later.
The first image is Bernard Romans’ An Exact View of the Late Battle at Charlestown, June 17th, 1775, published as an engraving a few months after the battle. An Exact View is the first depiction of a major American battle ever published. The second is one of the most famous images of the American Revolution—John Trumbull’s painting The Death of General Warren at the Battle of Bunker’s Hill, June 17, 1775. Trumbull’s vision of the battle has shaped the way Americans have imagined the Battle of Bunker Hill for the last two hundred years.
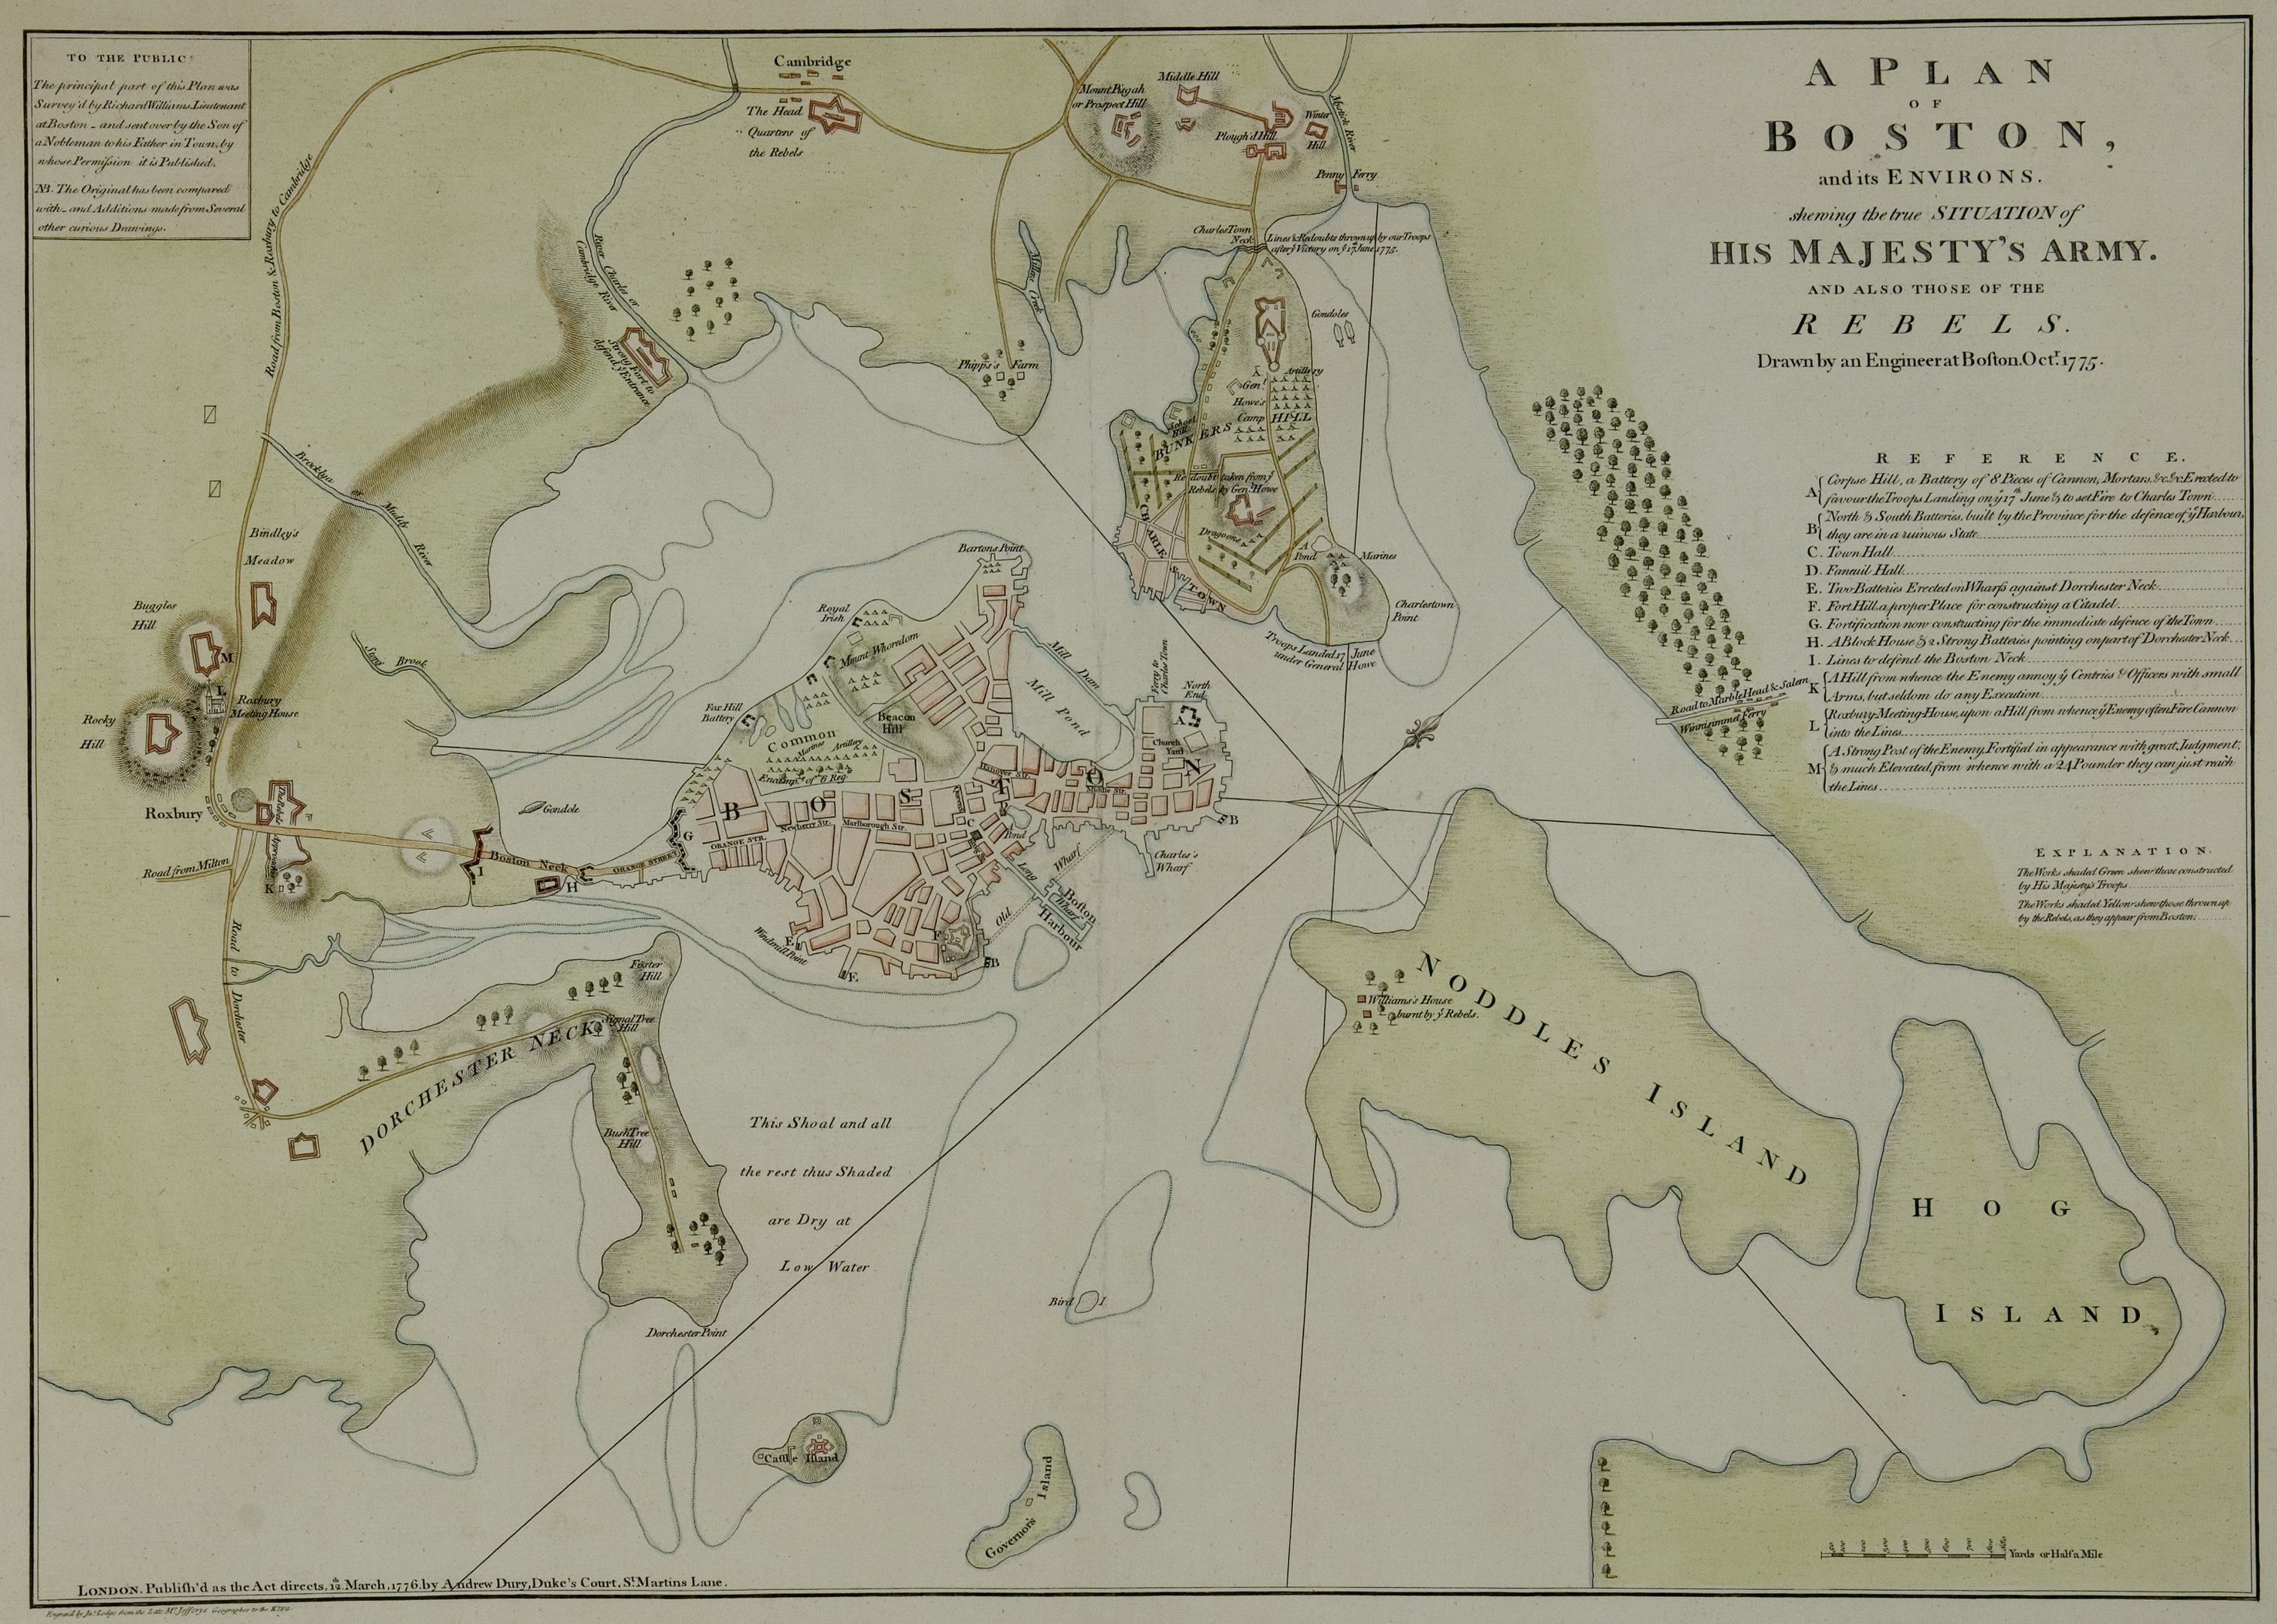
To analyze the two images, students will need to understand the basic narrative of the the Battle of Bunker Hill, which may be best accomplished with a short lecture, using two contemporary maps as visual aids. Questions to pose to students about the images are indicated in bold type and are intended to be addressed in a Think/Pair/Share format.
The Battle of Bunker Hill was the first major battle of the Revolutionary War. It was a major event in the Siege of Boston, which started on April 19, 1775, and lasted until March 17, 1776. The siege began on the evening after the Battles of Lexington and Concord, as Massachusetts militia surrounded Boston, which was occupied by the British army. Men from other New England colonies soon joined them.
The Massachusetts Provincial Congress, the colony’s revolutionary government, organized the forces surrounding Boston into a provisional army. The whole force was placed under the command of General Artemas Ward, a Massachusetts militia leader and veteran of the French and Indian War. The provisional army was lightly trained and poorly supplied, and Ward’s command over militia from other colonies depended on the cooperation of generals sent with those men by their own colonies.
The aim of the provisional army was to force the British out of Boston, but attacking the British army was impractical. Boston was almost entirely surrounded by water. It was connected to the mainland by a narrow neck of land that the British army had fortified with earthworks armed with cannons. Attacking the neck would have been futile. The patriots would have suffered heavy losses with little chance of success.
Instead the patriots laid siege to the town. They posted men outside the neck and across every route into or out of Boston, and constructed their own earthworks armed with cannons to prevent the British from getting out of Boston or bringing food and other supplies into the city from the surrounding countryside. Unfortunately for the patriots, the British Royal Navy controlled Boston Harbor and could supply the British army by water. The patriots had no navy to prevent them from doing so. As a result, the patriots could not starve the British army into surrender or force it to leave the city because British soldiers were going without food. Rations were cut and obtaining fodder for horses became difficult, but the British army remained.
In fact, the British army was strengthened. Reinforcements arrived in May, increasing the British force to about 6,000 men. Three British generals who would each play a major role in the Revolutionary War arrived with them. These were William Howe, John Burgoyne, and Henry Clinton. British General Thomas Gage, the commander of the British army in Boston, made plans to end the siege. On June 12, Gage issued a proclamation offering to pardon men (except patriot leaders Samuel Adams and John Hancock) who would lay down their arms. This had little effect. If anything, it made the patriots surrounding Boston more determined than ever.
To end the siege, Gage planned to send men across the narrow channels separating Boston from Charlestown Neck to the north and Dorchester Neck to the southeast. These were peninsulas overlooking Boston and Boston Harbor. The patriots had not occupied either of them. The Dorchester Neck overlooked Boston Harbor. Cannons mounted there by the patriots could command the harbor and force the Royal Navy out of Boston. The Charlestown Neck overlooked the city. The small town of Charlestown faced Boston across the channel. Behind the town, Charlestown Neck was dominated by two hills—Breed’s Hill just north of the town, and Bunker Hill (sometimes written Bunker’s Hill) to the north of Breed’s Hill. Cannons mounted on these hills could bombard the British army in Boston.
The patriots had not already occupied either peninsula for three reasons: first, because they lacked the heavy cannons, capable of firing long distances, to make effective use of them; second, because they had no interest in bombarding the British army in Boston (this would have destroyed much of the city); and third, because a patriot position on either peninsula could be cut off by a British force, transported by water, that might land on the narrow necks of land connecting the peninsulas to the mainland. Unless these necks were strongly held, the two peninsulas could become traps.
Gage planned to occupy both peninsulas as a step toward ending the siege. Occupying them would deny them to the patriots and British forces on them would threaten the north and south flanks of the thinly spread patriot army. The patriots learned of these plans on June 15, and immediately decided to occupy Charlestown Neck before the British landed. On the night of June 16, patriot forces occupied Charlestown Neck and constructed a square redoubt—a kind of earthen fort—on the top of Breed’s Hill.
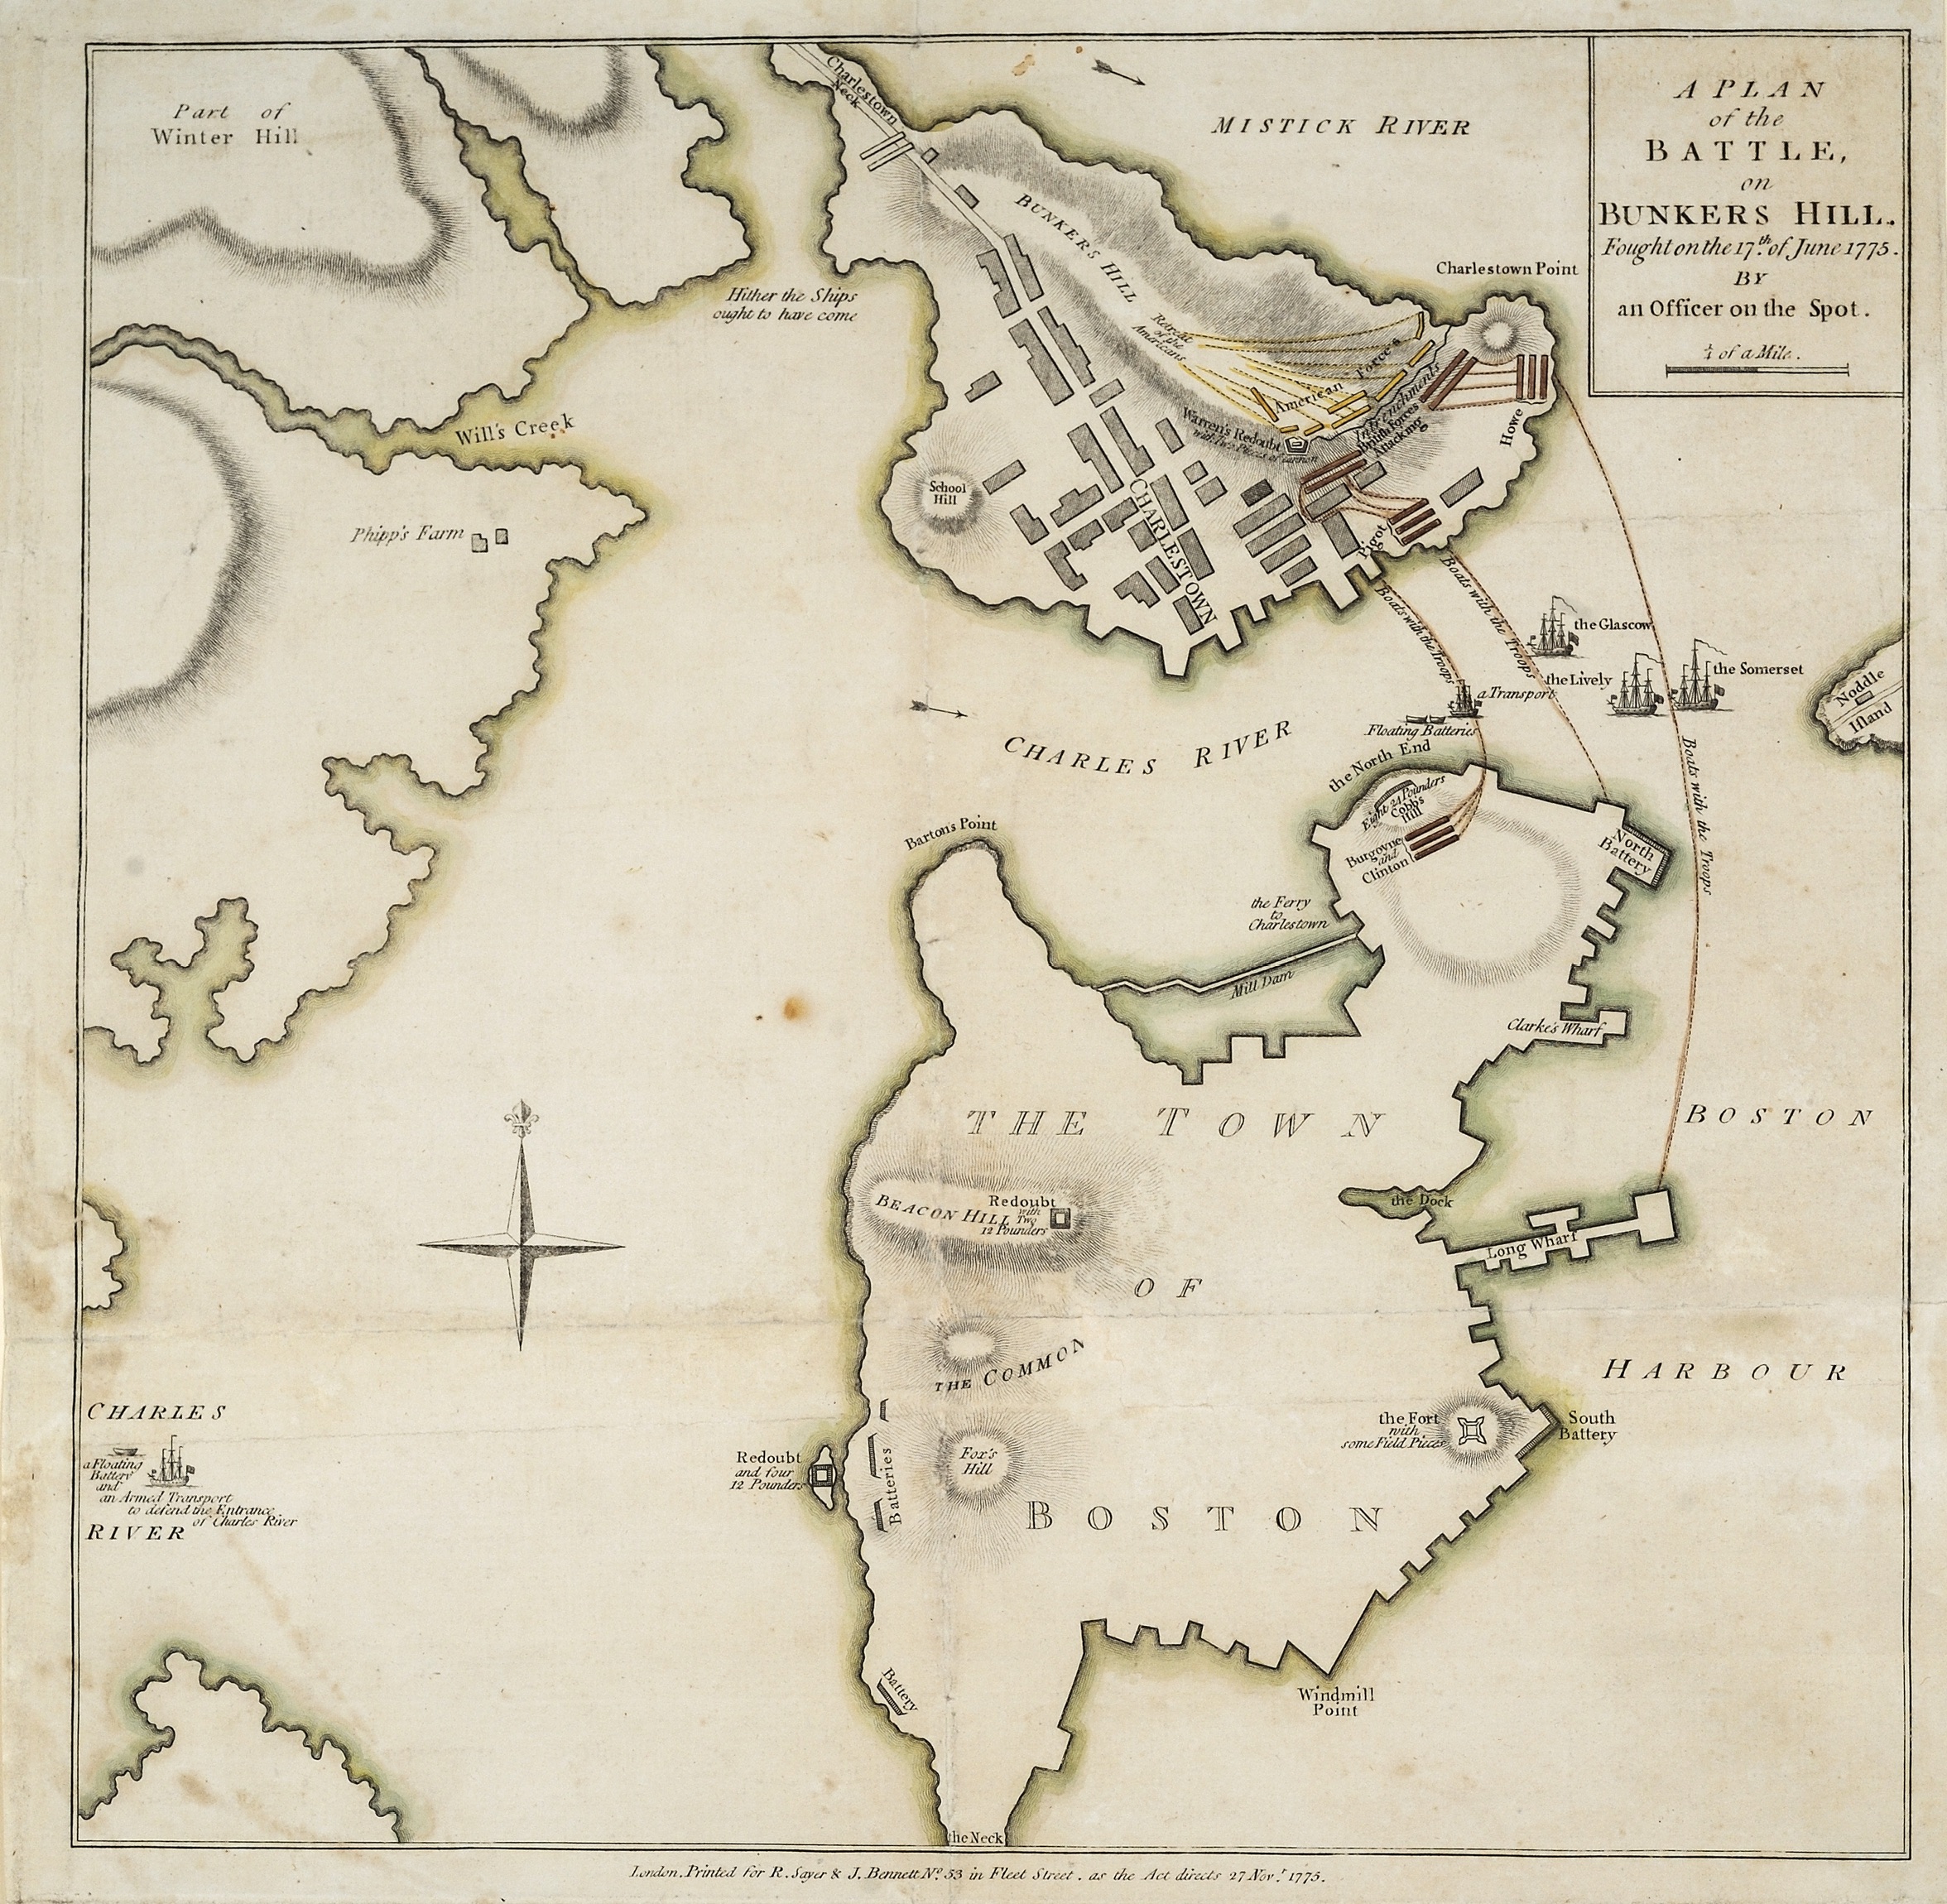
The British saw the patriot position at first light on June 17. General Gage immediately ordered British troops to cross the channel and drive the patriots away. The British expected to sweep the patriots from the field with one determined attack. The patriots repulsed the first assault and the second. The hillside below the redoubt was strewn with dead and wounded British soldiers. The British succeeded on their third attack, which reached the redoubt after most of the patriots had expended all of their ammunition. The patriots abandoned the redoubt and retreated off Charlestown Neck. British General John Burgoyne wrote that the retreat was “no flight,” and that “it was even covered with bravery and military skill.” The patriots lost about 115 dead, 300 wounded, and 30 men taken prisoner. Most of the patriot casualties occurred during the retreat.
The Battle of Bunker Hill was a British victory, in the narrow sense that the British army achieved its objective of driving the patriots off Charlestown Neck. But the victory came at a high cost. Reports of the losses vary somewhat, but out of about 3,000 men who crossed over from Boston, the British lost something like 19 officers and more than 200 enlisted men killed. In addition, 62 British officers were wounded, along with nearly 800 of their men. More than a third of the British soldiers involved in the battle were killed or wounded. British General Sir Henry Clinton remarked that “a few more such victories would have shortly put an end to British dominion in America.”
At first, patriots were of divided mind about the battle. Most were pleased to have punished the British army so severely, but some believed that the patriots should have held their ground and won the battle. American commanders, in particular, looked for reasons for their defeat. Israel Putnam, one of the generals on the field, argued that the patriots would have won if the artillery had been properly handled.
In time the Battle of Bunker Hill was regarded by most patriots as a great success. It seemed to many people to demonstrate that American militia—lightly trained but committed to the cause—could fight the well trained soldiers of the British army on roughly equal terms. News of the battle inspired enlistments in the Continental Army, which was established by a resolution of the Continental Congress meeting in Philadelphia on June 14, just three days before the Battle of Bunker Hill. On July 3, George Washington arrived to take command of the army outside Boston.
The Siege of Boston was ultimately a success. The British, unwilling to risk a second Bunker Hill, did not attack the patriot positions around Boston again. The Continental Army maintained the siege for several months. In March 1776, the Continentals fortified Dorchester Neck and mounted heavy cannon there. Those cannons commanded much of Boston Harbor. With the Royal Navy unable to move safely in and out of the harbor, the British army was forced to evacuate Boston. The British left Boston on March 17 and never returned.
Bernard Romans’ An Exact View of the Late Battle at Charlestown
People all over Britain’s American colonies were anxious for news about what was happening around Boston. They were particularly interested in accounts of the Battle of Bunker Hill. Many Americans learned about the battle in private letters, passed from hand to hand, and in newspaper accounts published in most of the colonies during the summer of 1775.
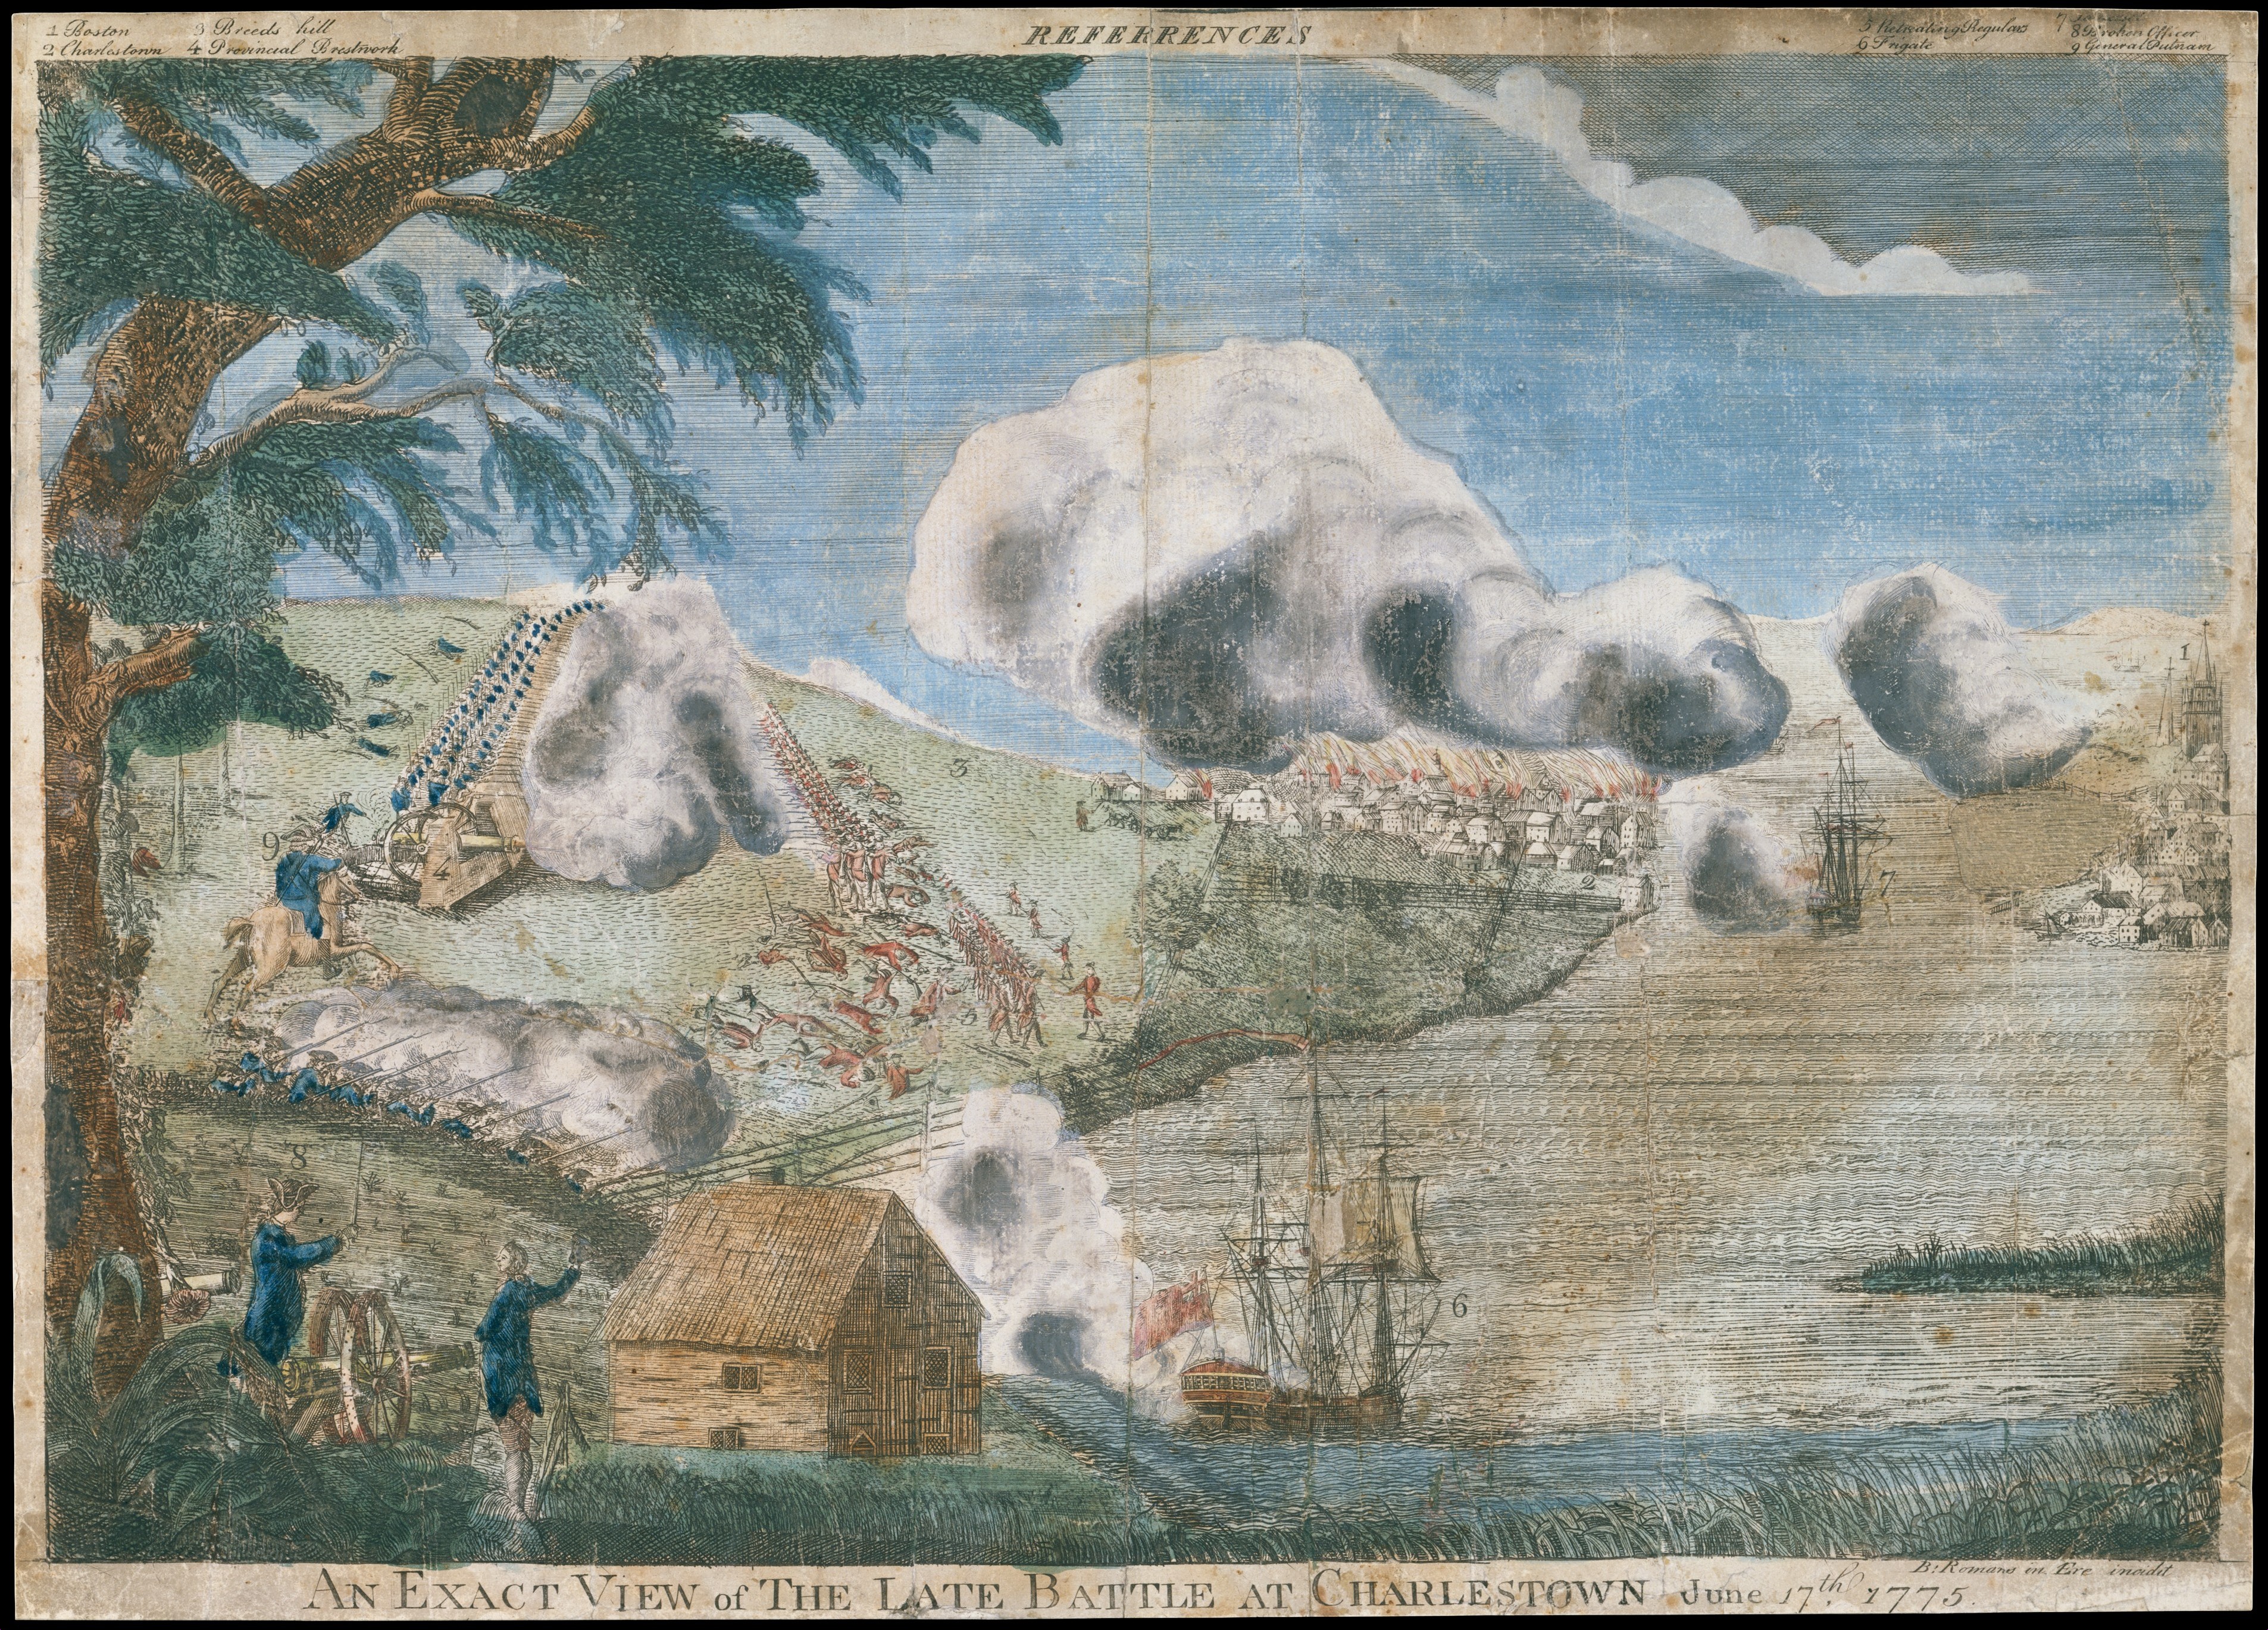
The first published image of the battle was created by Bernard Romans, a surveyor and cartographer who was outside Boston when the battle took place. Romans drew a sketch of the battle based on his knowledge of the setting and descriptions provided by participants. He traveled from Massachusetts to Philadelphia that summer and placed an advertisement in the Pennsylvania Gazette on September 20, 1775: “It is proposed to print an exact view of the late Battle at Charlestown, June 17, 1775 . . . on good crown imperial paper, to be delivered to the subscribers in about ten days: The price to the subscribers is 5s. plain, and if colored 7s.”
Before Romans’ print was ready to sell, a Philadelphia printer named Robert Aitken obtained one of the prints, copied it—without any credit to Romans—and offered it for sale. In an advertisement published in the Pennsylvania Ledger on October 7, the frustrated Romans described his view as “much superior to any pirated copy now offered or offering to the public.” But it was too late. Aitken’s cheaper pirated version had saturated the market.
Romans’ depiction is primitive in style, but richly detailed. On the right and in the middle foreground, British warships fire in the support of a British assault. Charlestown, at right center, is in flames, as it was after Admiral Sir Richard Howe ordered his warships to fire heated shot into the town, which was reduced to ashes. The British army is advancing in lines, as it did during the disastrous first and second assaults. This tactic was adopted to overawe the rebels and reflected British contempt for their opponents. Only on the third assault did the British resort to the more conventional tactic of advancing rapidly in columns.
Look closely, and you will see that the left flank of the British attack is crumbling under American fire, and redcoats are retreating, leaving their wounded on the field. British artillery can be seen, very faintly, between the British infantry and Charlestown. British guns, which should have advanced with the infantry, were supplied with the wrong ammunition and did not advance in support of the infantry until the third assault, after the right ammunition arrived.
The first question students should consider is: Why did Romans depict the battle in this way? The most obvious answer is that this was as accurate a depiction of the battle as Romans could create, based on his knowledge of the scene and the testimony of participants. This may be correct, but it leads to a more interesting question: Why did Romans choose this moment in the battle to depict?
The answer most likely to occur to a student is that Romans chose to depict a moment in the battle, during the unsuccessful first or second assault by the British, when the patriots were inflicting the most casualties—when the Americans were winning—rather than the third and final assault in which the British overwhelmed the American line. According to this line of interpretation, Romans wanted to present the patriots as heroes.
There is merit to this view, but students should also consider why Romans included the two rebels standing in the left foreground, one holding up a short sword and the other waving his hat, with his sword visible below the hem of his coat. It would be easy to conclude that these figures are wholly imaginary, but in fact they depict real people. The officer on the left (we know they are officers because they are carrying swords) is Captain John Callender. The one on the right is Captain Samuel Gridley.
Callender and Gridley each commanded a two-gun battery. Early on the morning of the battle, they were ordered to move their guns into the redoubt, only to find there were no openings in the redoubt for them to fire through. Under orders from William Prescott, commanding in the redoubt, they moved their guns outside the prepared defenses to an exposed position on the hillside and began firing in the general direction of British warships in the channel.
Gridley and Callender soon found that most of their flannel-covered gunpowder cartridges were too large for their guns and that their solid shot was the wrong size. With the British infantry moving forward to attack, they decided to withdraw. Israel Putnam caught sight of the retreating guns and ordered Callender to go back. Callender responded that he had no cartridges, whereupon, according to later testimony, “the General dismounted and examined his boxes, and found a considerable number of cartridges, upon which he ordered him back; he refused, until the General threatened him with immediate death, upon which he returned up the hill again, but soon deserted his post and left the cannon.”
After the battle, Putnam demanded that Callender be court martialed for cowardice and “ought to be punished with death.” The court martial found Callender guilty of cowardice but failed to impose a punishment, leaving that task to the new commander in chief, George Washington, who arrived a few days later. Washington reviewed the case and stripped Callender of his rank, explaining to the entire army that cowardice is “a Crime of all others, the most infamous in a Soldier, the most injurious to an Army, and the last to be forgiven.”
The figure waving his hat in the print is Samuel Gridley, who was described in the court martial as having “fir’d a few times then swung his Hat three times round to the enemy and ceas’d to fire.” We can be equally certain that the figure with the upraised sword is Callender, because in the print he has the number eight above his head. In the key on the margin, eight is identified as “Broken Officer.” This is a reference to Callender, whose court martial and conviction must have been common knowledge in the Continental Army camps outside Boston when Romans was there.
Students should consider: Does knowing that the figures in the foreground were artillery officers who were charged with cowardice change your interpretation of what Bernard Romans was trying to convey in his depiction of the battle?
This is a question worthy of a general discussion. This detail, which is not commonly recognized by modern viewers, was probably understood by people who saw the engraving in 1775. At that time many people believed that the Americans could have won the battle if the artillery had been better served. General Israel Putnam—the figure on horseback in the engraving—was one of them. Romans may have shared this view, or at least wanted to show his audience how effectively the patriots resisted the British as well as to suggest why they lost the battle.
John Trumbull’s The Death of General Warren at the Battle of Bunker’s Hill
The second image of the battle to consider is John Trumbull’s monumental painting, The Death of General Warren at the Battle of Bunker’s Hill, June 17, 1775. Trumbull was obviously a much more talented artist than Bernard Romans. He was, in fact, one of the most important American artists of the Revolutionary generation. He was a member of a prominent patriot family and was educated at Yale. He served in the American army briefly, then resigned to study painting in London with Benjamin West, an American-born painter who had moved to Britain and established himself as the greatest painter of historical subjects of his generation. With West’s encouragement, Trumbull decided to create a series of history paintings about the American Revolution. He wrote to his father, “the great object of my wishes . . . is to take up the History of Our Country, and paint the principal Events particular of the late War.”
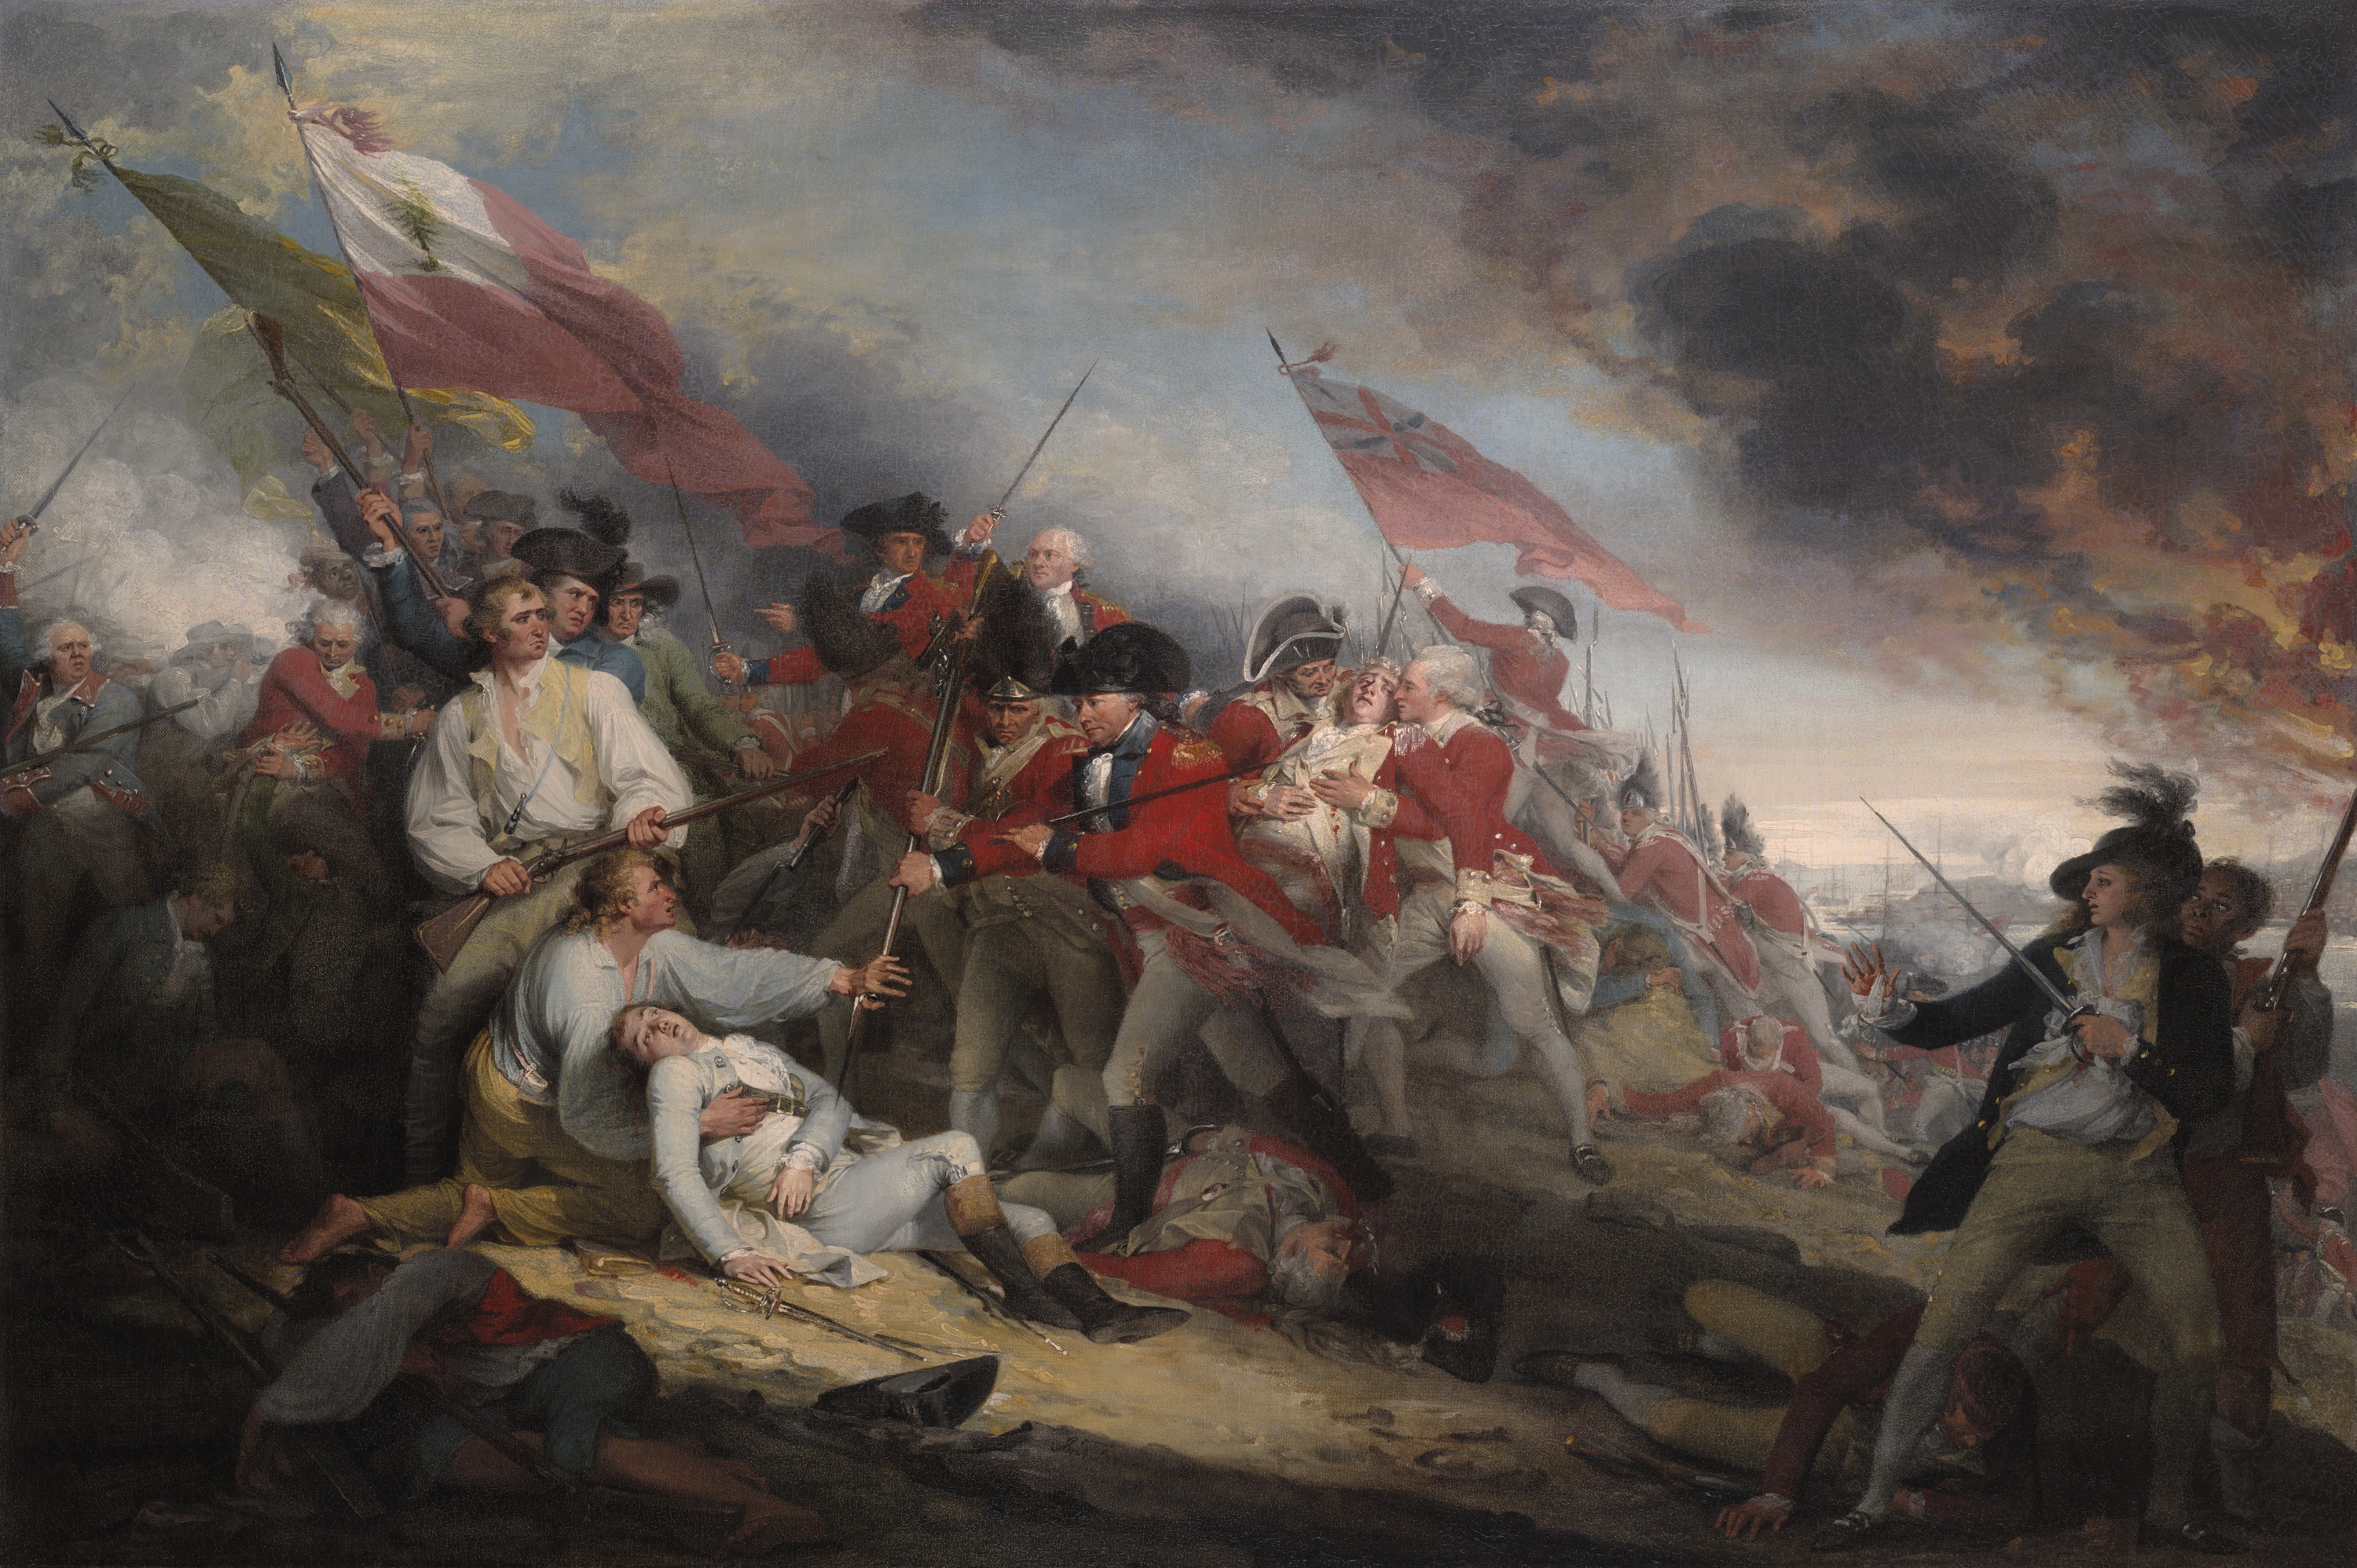
Trumbull chose the Battle of Bunker Hill as his first subject. The resulting painting, completed in 1786, remains one of the most familiar images of the Revolutionary War. Students should consider: How does Trumbull’s depiction of the Battle of Bunker Hill differ from Bernard Romans’ version of the battle?
The superficial answer is that it is a much more refined work of art, but encourage students to look past this obvious fact. Several more thoughtful answers are possible, among them the fact that Romans depicted the battle from a distance, while Trumbull brings the viewer right into the action at its height and presents the combatants close up. In fact, many of the people depicted in the painting are known participants, not generic figures.
Encourage students to consider the point in the battle: What moment in the battle does the painting depict? If students understand that the patriots repulsed two British assaults and were overrun by the third, some will recognize that Trumbull chose to depict the climax of the battle, when the British overran the American redoubt and the patriots were forced to retreat. If this is not clear, ask students: What suggest that the painting depicts the moment the British overran the American positions and won the battle?
This isn’t obvious, of course. At far left the figure in a green coat with his sword raised is Israel Putnam, ordering the retreat, but the patriot retreat is also suggested by the composition of the painting. Point out that most of the action—the weight of the painting—is on the left side, suggesting that the patriots are being driven in that direction.
This suggests one of the most interesting questions about this painting: Why would an American painter make the moment of a patriot defeat the subject of one of his greatest paintings? One answer that might occur to students is that Trumbull, having moved to Britain to study art with Benjamin West, had developed sympathies for the British that were reflected in the painting. What in the painting itself suggests Trumbull was sympathetic to the British?
The answer most likely to occur to a student is that British soldiers are depicted struggling and dying in the same manner as American soldiers, most prominently the British officer falling wounded (mortally wounded, in fact) into the arms of a fellow officer at the center of this painting. A student may point to this as evidence of British sympathies. This part of the painting depicts the death of British Major John Pitcairn, commander of the British marines in Boston. The officer into whose arms he is falling is, in fact, his own son. These details were known to many people in Britain and the United States who saw the painting. The depiction of a father dying for his country in the arms of his son seems to symbolize sacrifice in a cause greater than one’s self. John Trumbull was a patriotic American, but he recognized that the British were sacrificing themselves in their king’s service.
The sacrificial death of Major Pitcairn is a secondary drama in the painting. The primary one is the death of the central figure, Dr. Joseph Warren, lying at lower left in the arms of a fellow patriot. Warren was one of the most respected figures in the patriot resistance to British tyranny in the years leading up to the war. Elected president of the Massachusetts Provincial Congress, he was appointed a major general of the militia on June 14, 1775, but he insisted on fighting at Bunker Hill as an ordinary private, arguing that General Israel Putnam and Colonel William Prescott, the commander of the redoubt, were more experienced soldiers and worthy of command.
Warren fought until his ammunition ran out, and when the British columns reached the redoubt in the third assault, he was one of the last men left facing the enemy. Warren was killed instantly by a musket ball to the face, not from a wound to the body. British soldiers ran his body through repeatedly with bayonets, stripped him of his clothing, and buried him in a shallow ditch near where he fell. A few days later a British sailor opened the shallow grave and further desecrated Warren’s body, leaving it unrecognizable. Trumbull chose the moment the patriots lost the battle because it was also the moment of Warren’s death.
Why did Trumbull make Warren’s death the central drama of the painting? The most obvious, and certainly correct, answer to the first question is that Trumbull wanted to enshrine Joseph Warren as a martyred hero of the new American nation. By 1786 Warren’s status as hero of the Revolution was already established. Dozens of towns and counties had been named for him, and simple accounts of his life and patriotic, sacrificial death had begun to appear in the first published histories of the American Revolution. By making him the heroic figure at the center of one of the new nation’s first history paintings, Trumbull hoped to create an image of Warren that would endure for generations. In this Trumbull was indisputably successful. More than 230 years after it was completed, this painting and Joseph Warren’s memory are still closely linked.
If Trumbull knew the actual circumstances of Warren’s death, why did he depict it in this consciously inaccurate way? This question reaches for the central premise of this lesson—that artists depict historical scenes in ways that best convey their ideas about events. Often they seek to convey a fundamental truth about an event that could not be conveyed effectively in a literal depiction.
Trumbull’s depiction of the climactic moments of the Battle of Bunker Hill compresses time and organizes people and events to convey a complicated series of ideas about the battle, and with it, the Revolutionary War. It was, for Trumbull a tragic conflict. This is suggested by the simultaneous death of Pitcairn and Warren. In fact, Pitcairn was mortally wounded in an earlier assault and never reached the redoubt. The British and Americans are equally courageous. This parallel is suggested by the upraised sword of American General Putnam, at far left, and the almost identical pose of British General Sir Henry Clinton, at the center of the painting. If the British grenadier at the center is cruel in moving to bayonet the wounded Joseph Warren, his commander is merciful in restraining him.
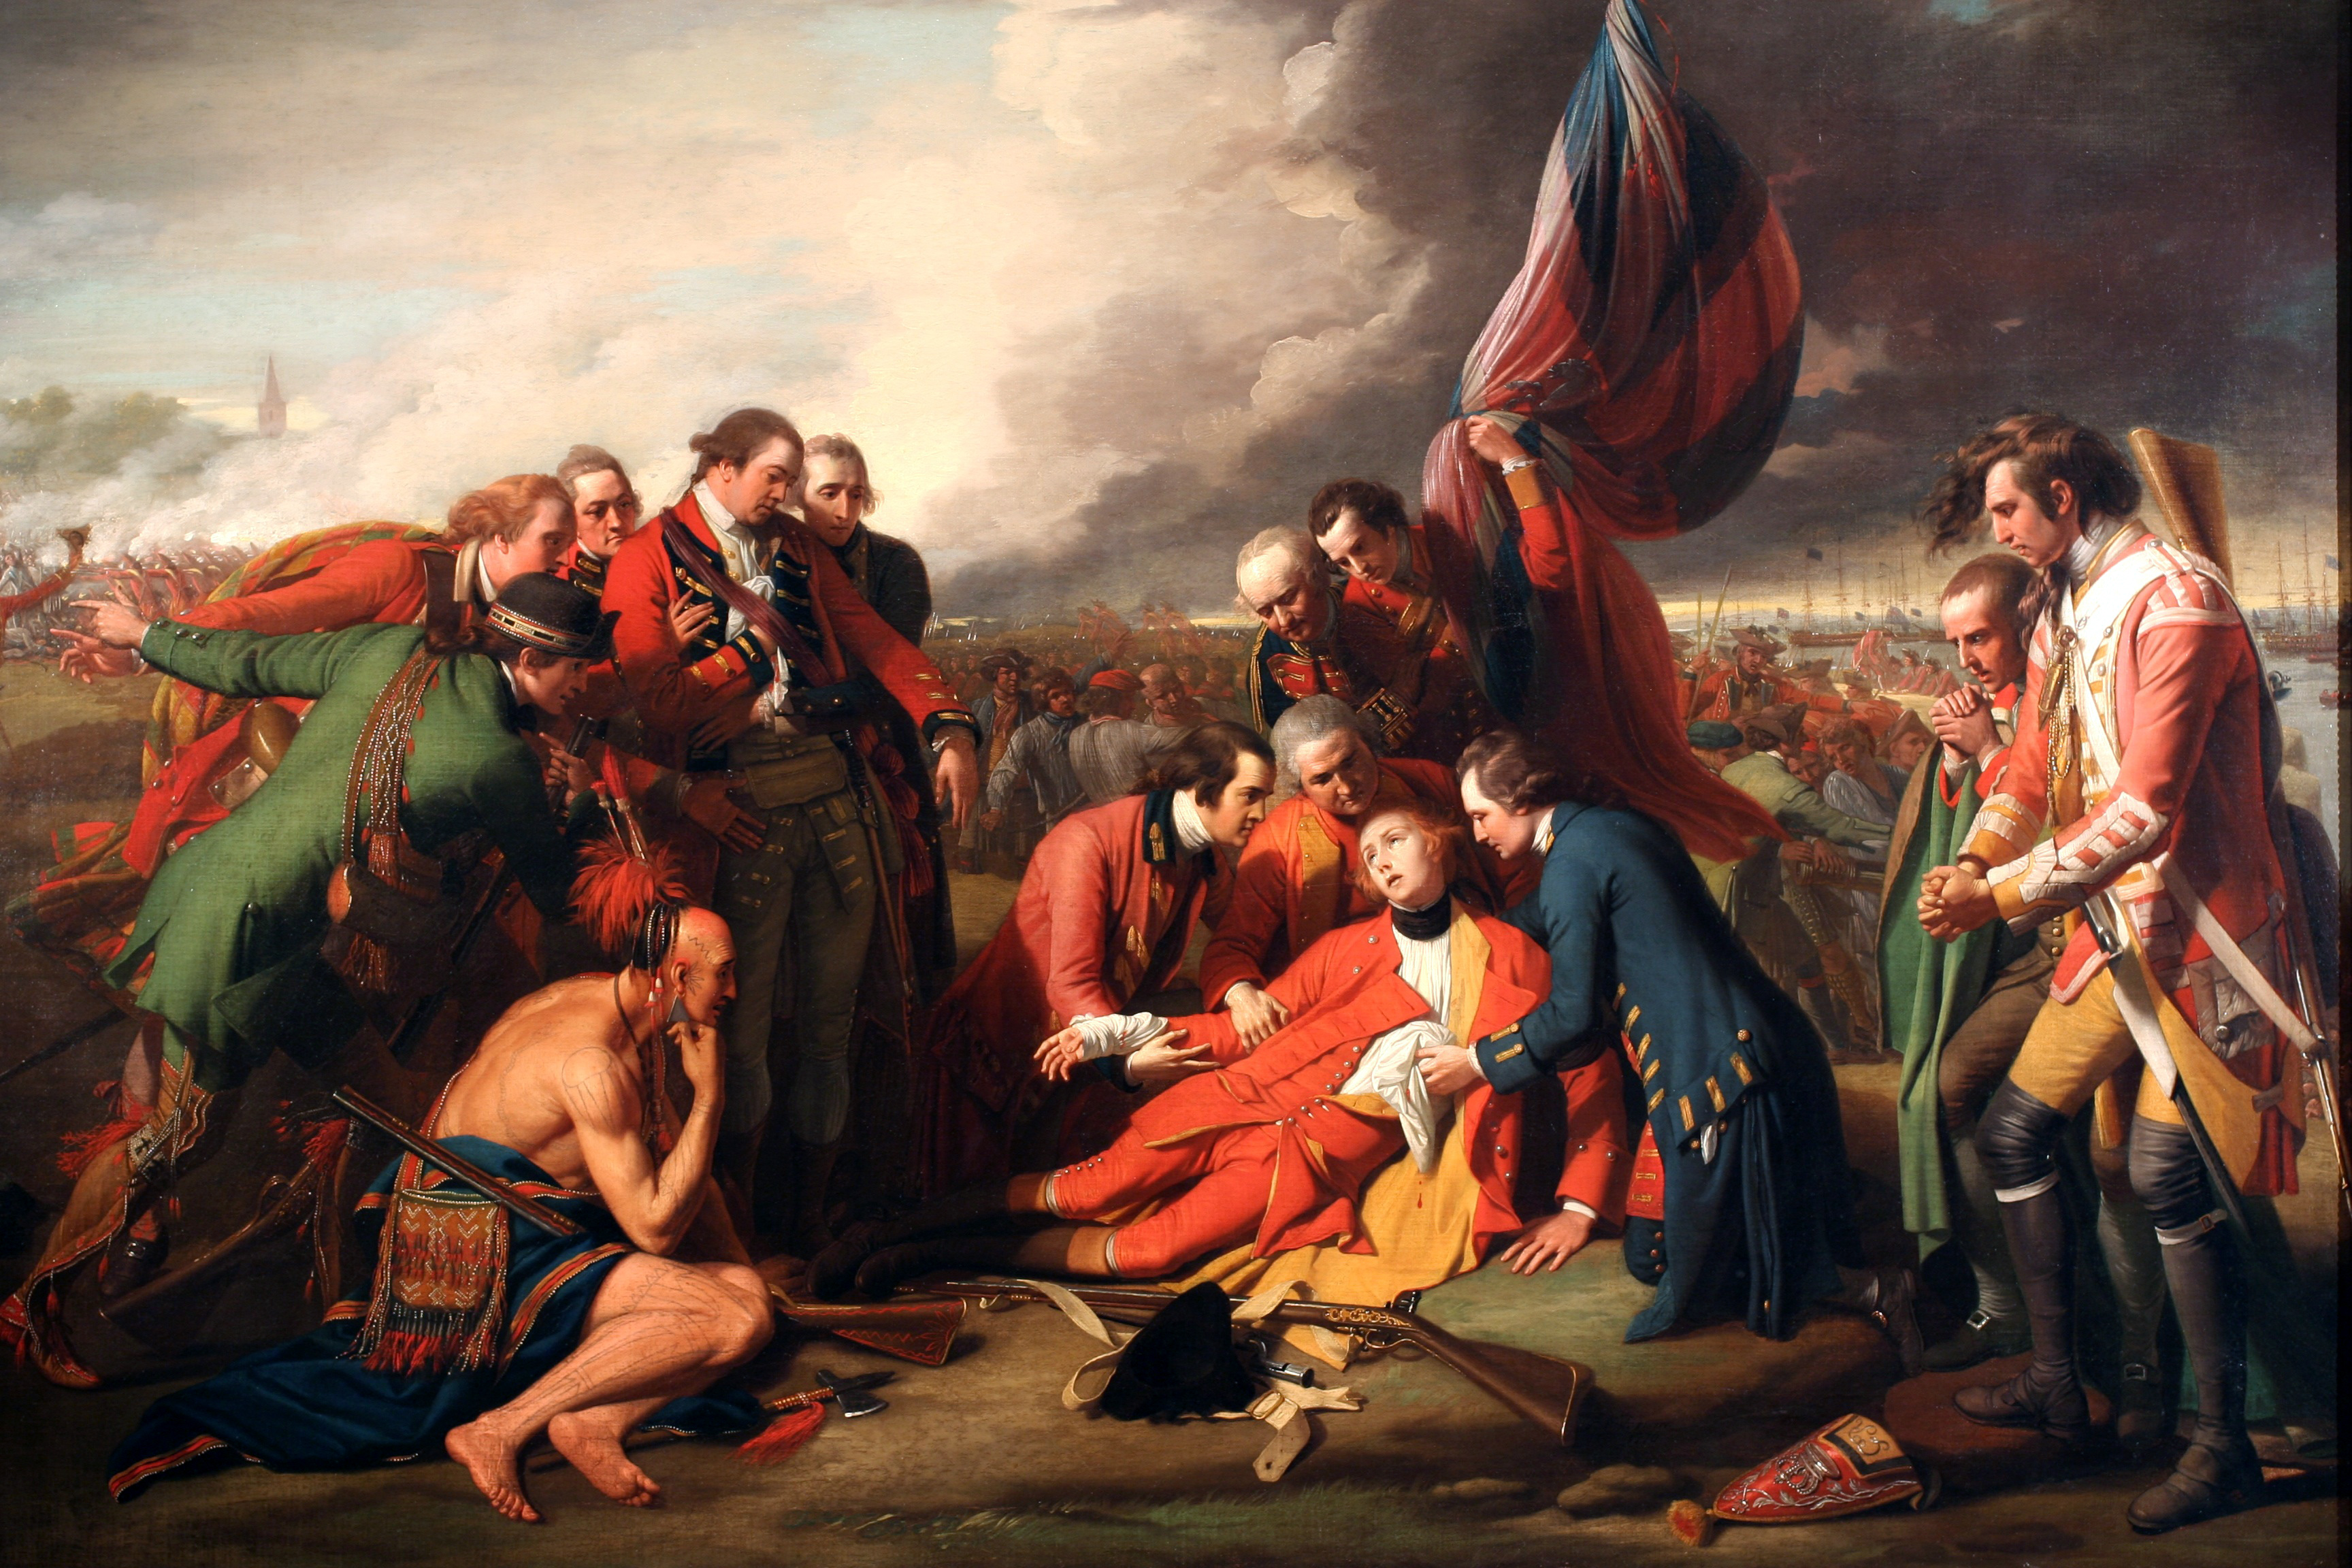
The central idea of the painting is that the new nation was the product of heroic sacrifice. Trumbull conveyed this idea by employing an artistic convention already several centuries old. Among the most powerful images in Western art had long been the descent from the Cross, in which the lifeless body of Jesus was cradled in the arms of his followers. Trumbull’s eighteenth-century audiences were very familiar with this image, which symbolized sacrificial death. Trumbull’s mentor, Benjamin West, had employed this same symbolism in his 1770 painting, The Death of General Wolfe, which depicted the dying British hero of the French & Indian War, who died just as his victorious army achieved the conquest of Canada.
Bernard Roman’s view of the Battle of Bunker Hill was soon forgotten, but John Trumbull’s has endured. This was due in part to Trumbull’s effective marketing. He had a large engraving of the painting made shortly after he completed it. These engravings were sold for a high price, but Trumbull soon arranged for the production and sale of smaller, less expensive versions that made the image available to ordinary Americans.
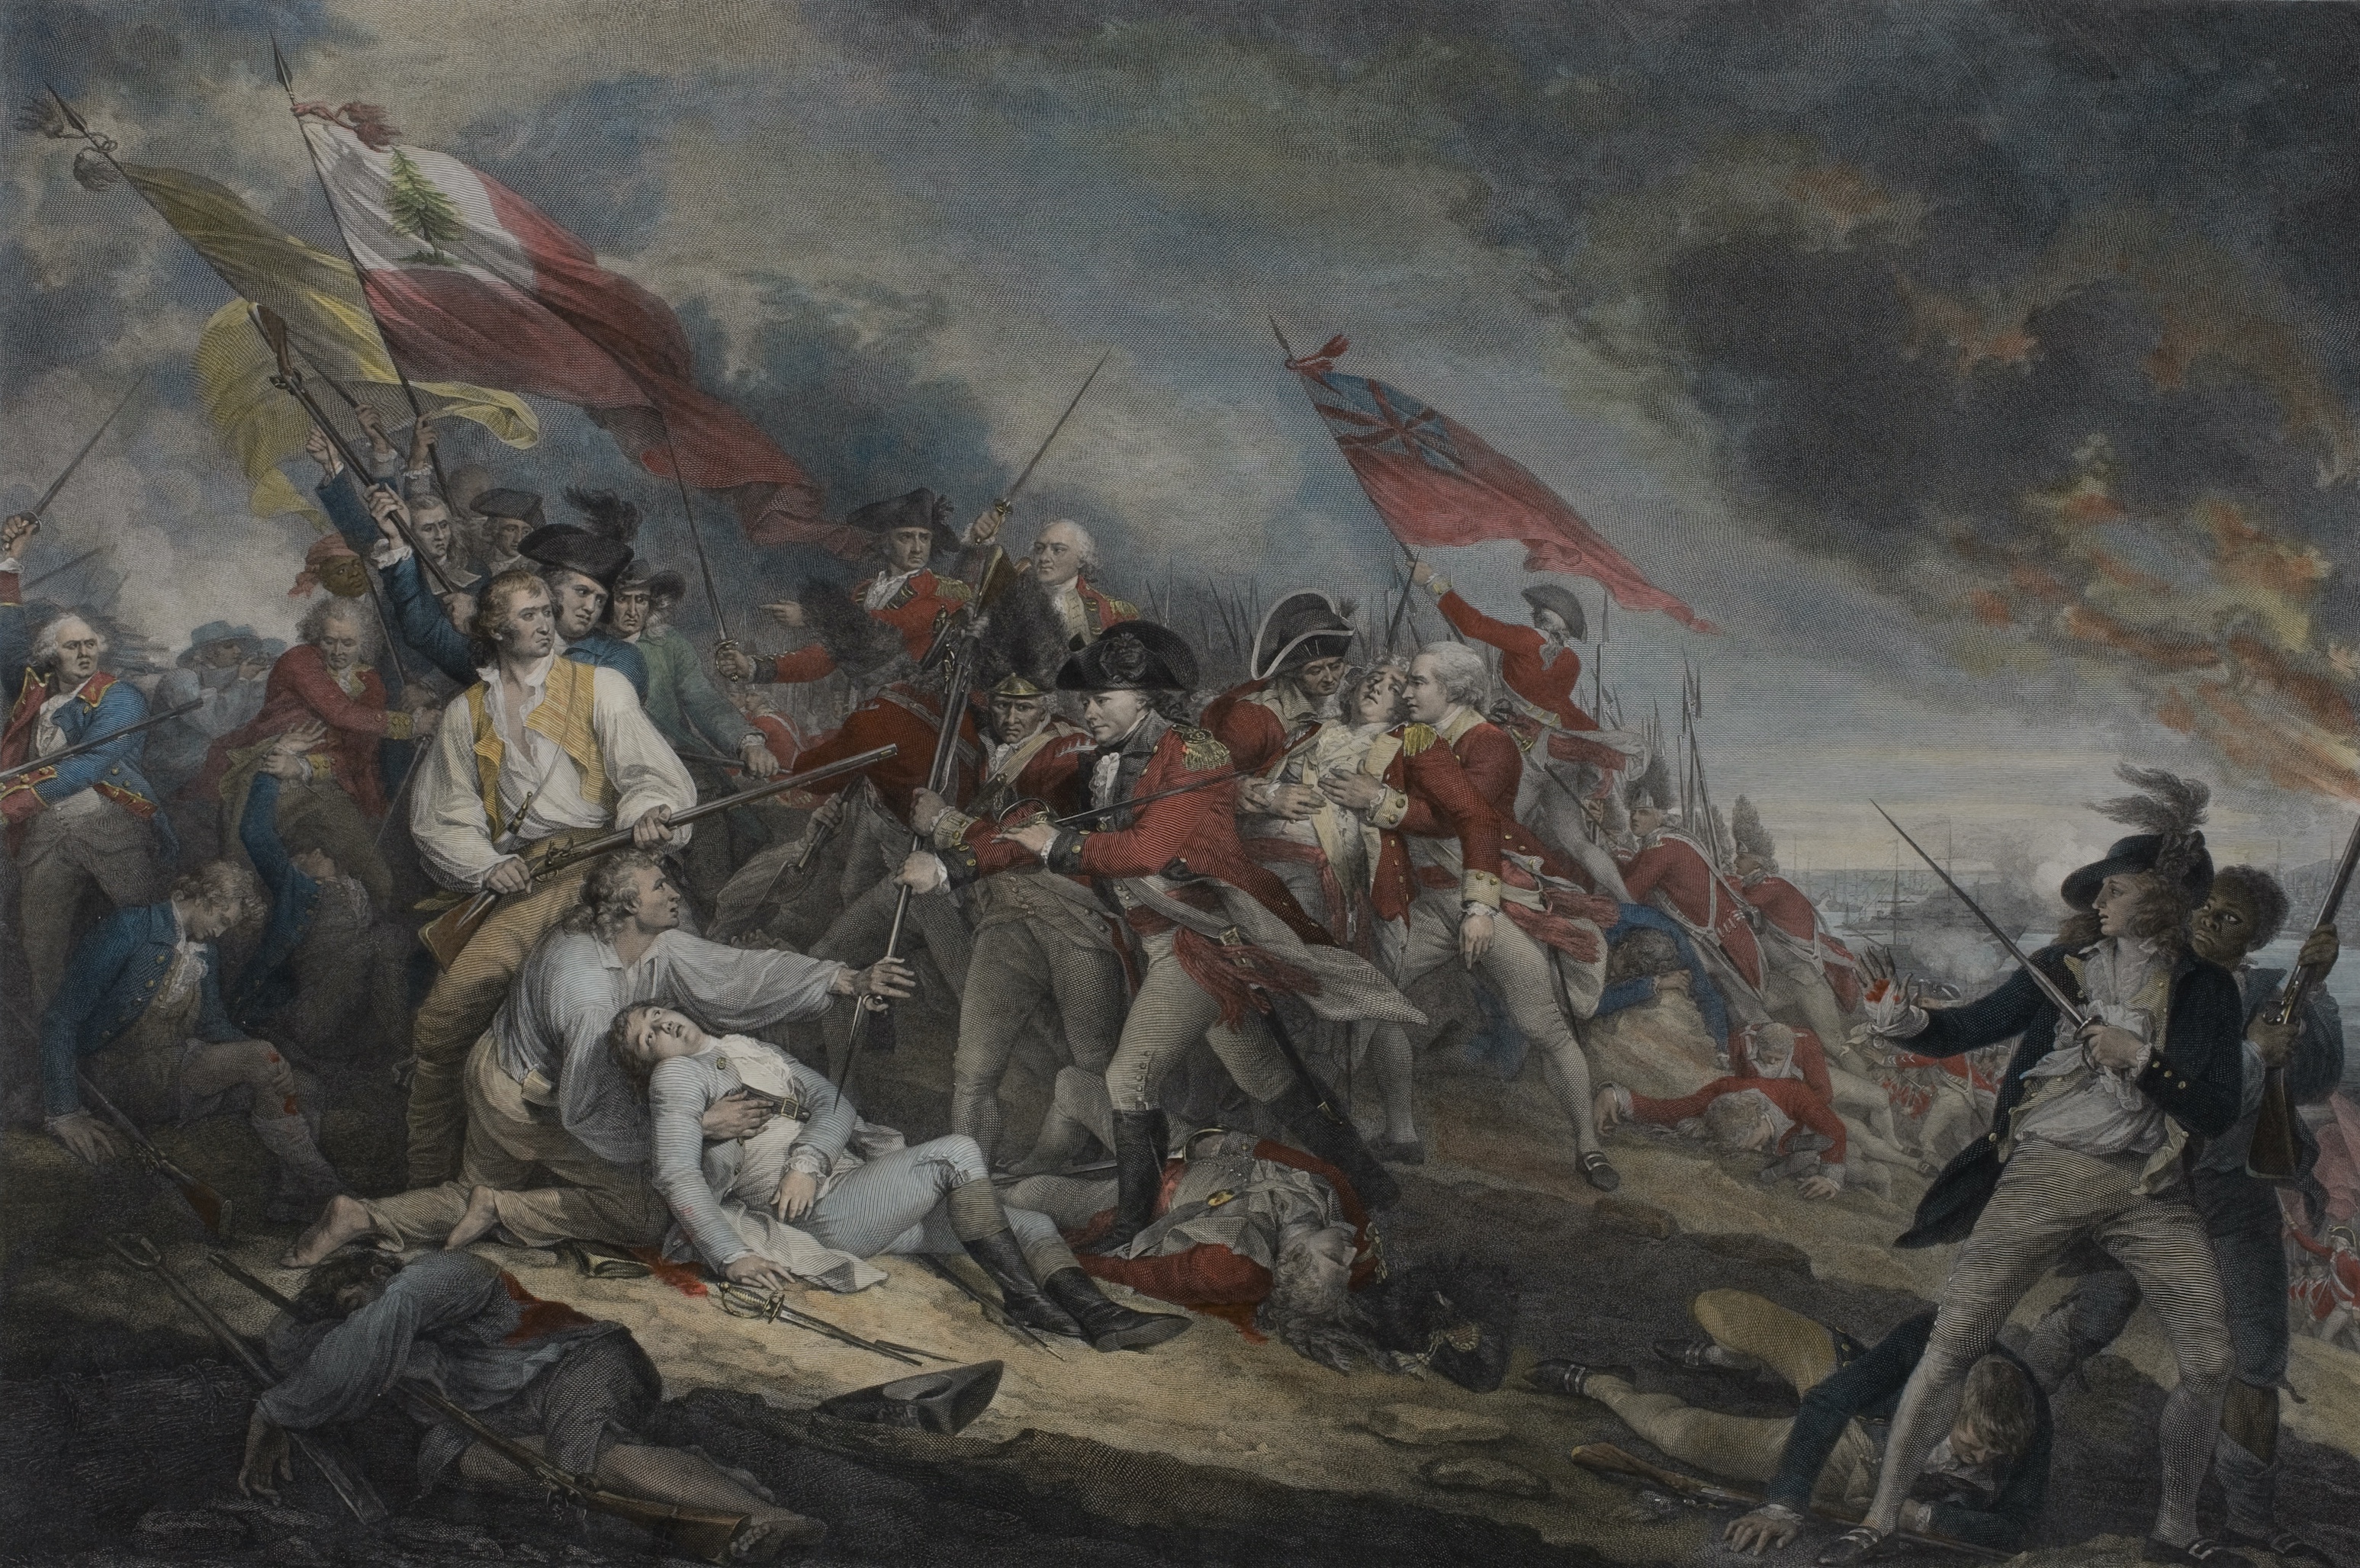
How do Trumbull’s Bunker’s Hill and this engraving produced under Trumbull’s supervision compare? How would distributing prints of Trumbull’s painting influence how Americans imagined the Battle of Bunker Hill?
By the 1820s, simple engraved versions of Trumbull’s depiction of the battle were appearing in popular histories and schoolbooks. Reproductions of Trumbull’s painting, like this lithograph produced and sold in the 1840s, were cheap enough for ordinary Americans to buy for their homes.
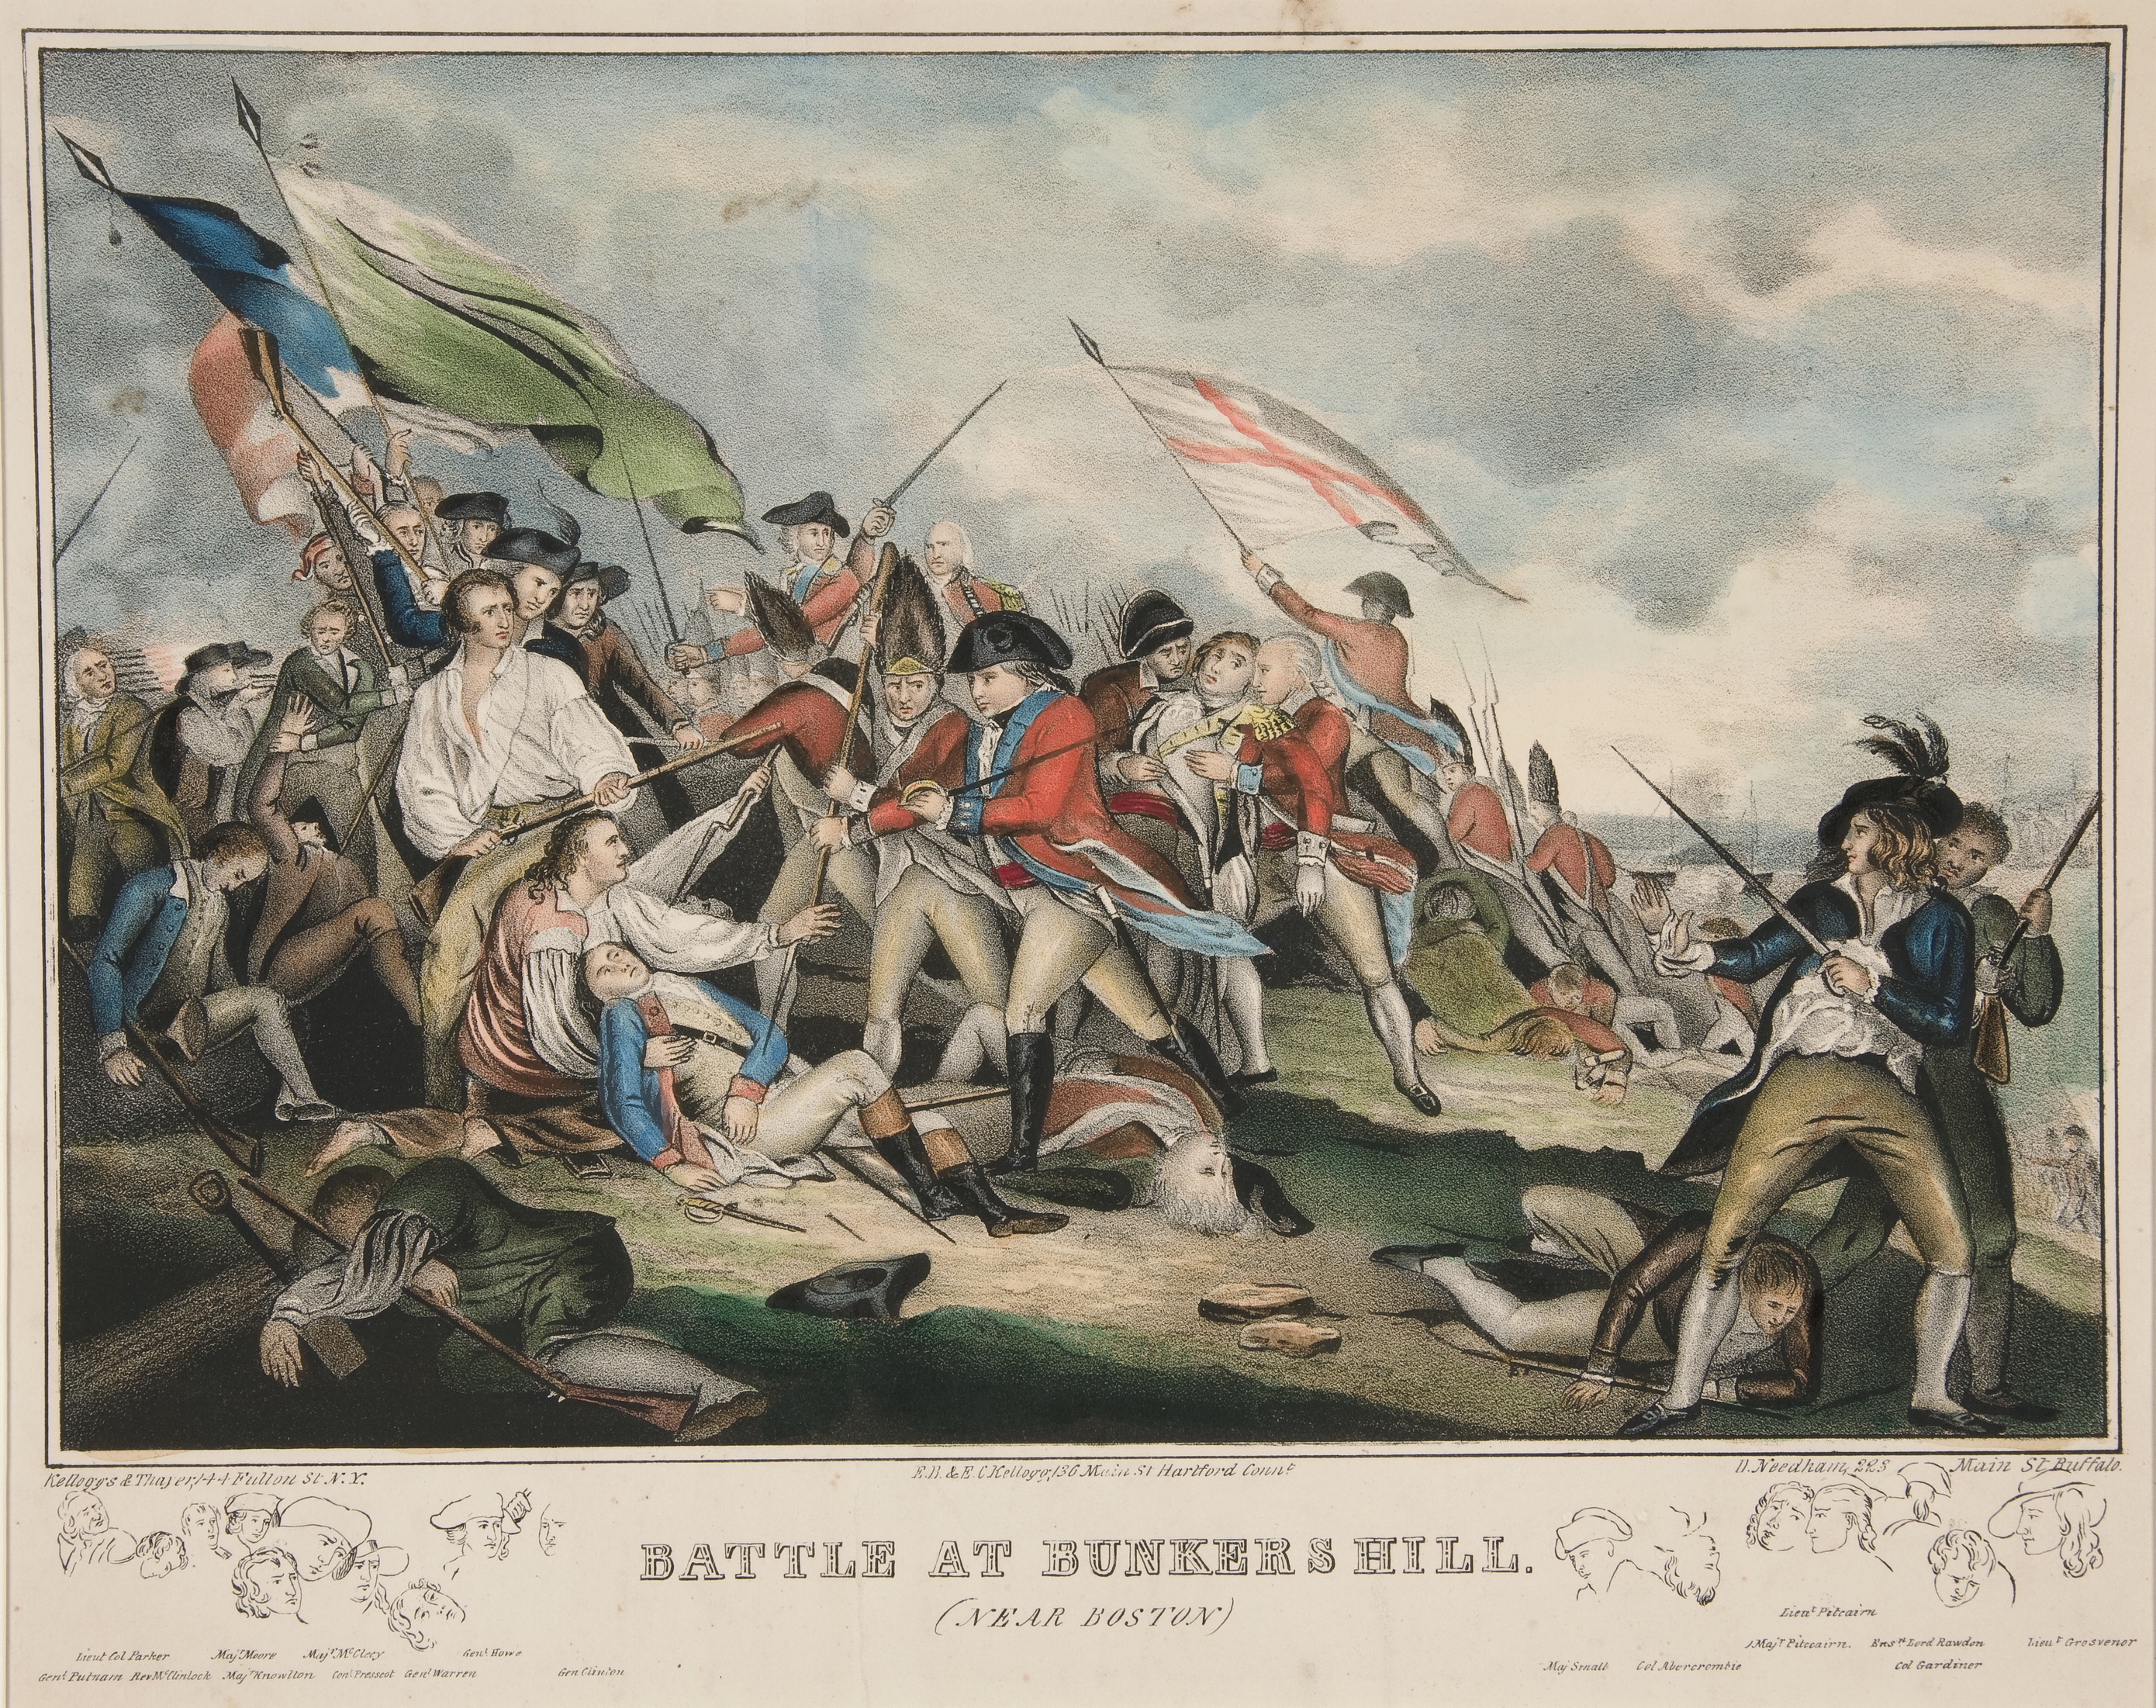
How are the fine engraving of the Battle of Bunker Hill and this 1840s lithograph similar? How are they different?
Through reproductions like this one, John Trumbull’s depiction of the Battle of Bunker Hill, with its symbolic representation of heroism, courage, determination and patriotic sacrifice, shaped the way Americans imagined the battle and more broadly their war for independence. It continues to shape the way we imagine the American Revolution today.
Assessment
Think/Pair/Share-Provide 6-8 minutes for students to individually answer on paper the questions below. Then pair students up to discuss their findings and revise their written answers. Students will submit final written answers to the questions for evaluation.
- Based on your analysis of his engraving of the Battle of Bunker Hill, how did Bernard Romans understand what had happened in the battle? How is this suggested by his depiction?
- How did John Trumbull understand the Battle of Bunker Hill, the American and British soldiers who fought there, and the importance of the battle in the larger story of the American Revolution? How did he portray these themes in the painting The Death of General Warren at the Battle of Bunker’s Hill, June 17, 1775?
- How were Bernard Romans’ view of the battle and John Trumbull’s view of the battle similar? How did they differ? How do you account for the differences?
- How has Trumbull’s Death of Warren shaped how Americans imagine the Battle of Bunker Hill and the Revolutionary War?
Images (in order of appearance):

The Death of General Wolfe
Benjamin West
National Gallery of Canada, Ottowa, Ontario

The Battle at Bunker’s Hill near Boston, June 17th 1775
Johann Gotthard Muller, engraver
1788 (London: A.C. de Poggi, 1798)The Society of the Cincinnati

Battle at Bunkers Hill
Hartford: E.B. and E.C. Kellogg, 1842?Yale University Art Gallery, New Haven
Additional Resources
Military Sacrifice and Civic Virtue, Saul Cornell, August 9, 2013
The Death of General Wolfe by Benjamin West by the National Gallery of Canada, July 19, 2012